Artificial Sunlight
March 5, 2022
It all started when I got a concussion and had to recover at our vacation rental in Tahoe. The lights in my bedroom gave me terrible headaches. One day I was fed up enough that I decided to take them out and ask my roommate to drive me to the nearest hardware store and see if we could buy new ones. The new LED lightbulbs I bought said they were GE Relax HD light bulbs with special color enhancing properties. I thought it was just marketing speak, but reviews online seemed to point to the effects being very real. Once installed, not only did my headaches go away but I also felt markedly more energetic and happier. I was hooked, and also extremely curious about what was going on. I wasn't working while recovering, so I ended up down the rabbit hole of light therapy. Turns out light having effects on mood is very well documented, and there are many existing products that use these principles to help enhance mood. The reviews, however, were not positive. Very few people actually saw the results they were promised. Reading more about the issue demonstrated that the research they used to justify their products required sitting in front of the light for hours at a time. They did this instead of making their lights brighter for 2 reasons, I surmised.
- cost - the lights were already quite expensive, and household lights were fairly low margin outside of designer lighting. Beyond materials costs for the light itself, bright light means more power usage, and more heat, which requires even more power and components to dissipate. For this to exist in the form factor that people are typically used to for lamps was simply not feasible, hence the compromise.
- comfort - a light so bright as is required to be effective for light therapy was not comfortable to look at. Imagine staring directly at the sun! That's how bright the light would need to be in every direction in order for it to be as effective. Why is the sunlight coming through a window not so uncomfortable? The geometry of the light is different. Light from the sun has a geometric property that allows it to project light in a particular direction (collimation) rather than being a diffuse point light source. This difference drastically affects the power efficiency of the light source required, too. Now the light source doesn't need to project light as bright as the sun in every direction, just in a particular direction. The optics for this sort of setup were a bit more popular in film lighting, but not so much in consumer lighting.
With no consumer available option, no experience with electronics, and abundant free time and curiosity, I decided to try to build my own. I was mostly following two leads.
- Lumenators - a community of online rationalists had determined the same needs I had and turned their particular disregard for aesthetics into the only feasibly effective light therapy setups I had seen. They would fill their living spaces with dozens of bright LED lights, and sit in front of them for hours at a time. They were also very open about their process, and had a lot of documentation on how they built their setups. 1234. I did not share their disregard for aesthetics, but their efforts reassured me that the effects were very real, and yet there was work still to be done to make it more accessible.
- DIY Perks5 - a youtuber who I found extremely inspiring. He has a lot of videos on how to build things that are typically very expensive, but with a bit of ingenuity and patience, can be built for a fraction of the cost. He also has a very strong aesthetic sense, and his videos are very well produced. Not only did he prioritize building things that were beautiful, but he also prioritized building things that were functional in exactly the ways I considered important. For light, he was clearly on the same journey I was, and much further ahead. He had started with making small artificial windows out of old laptop screens6, but once convinced that it was possible to go further he did not stop. He had a video on how to build a DIY LED panel that was very bright, and had a very high CRI (color rendering index), CRI is a measure of how well a light source can render colors. The sun has a CRI of 100, and most household lights have a CRI of 80. The GE Relax HD light bulbs I had bought had a CRI of 90, and I could tell the difference. The DIY LED panel he built had a CRI of 98, and I was very excited to try to build one that matched the sun. He also promised in future videos he would solve the problem of collimation, which with the laptop screens he did using fresnel lens sheets that were part of the laptop screens. I was very excited to see what he would come up with (he eventually did fulfill his promise, and it took up a whole extra room in his house 7), and to see what I might come up with myself.
Ultimately, this project started my entire journey of light, optics, electronics, 3D printing/fabrication. I started by building a small 1x2 foot LED panel. The principle behind building a panel is simple. If you want to make the light bright, it needs to either have one big LED or a bunch of little ones. One big LED requires specialized power delivery, heat dissipation, and the LED itself is quite expensive, but the optics for collimation are relatively simple. Many small LEDs are cheaper, can dissipate heat over more area, and can be powered by a simple power supply, but the optics for collimation are more complicated. I decided to go with the latter, and bought a bunch of LEDs and a power supply. I designed a simple assembly - an aluminum sheet would serve as both the substrate for the LEDs and the heatsink, an acrylic diffuser would be held above the aluminum sheet by some long bolts, and the LEDs themselves were simply a collection of tightly packed LED strips. I wired all the LED strips in parallel and soldered them to the power supply I bought. This prototype was already incredible for my needs. It was bright enough to light an entire room without any other lights on, and the color rendering was incredible. I could see the difference in color rendering between the GE Relax HD light bulbs and this panel, and it was a huge difference. The panel was about 30k lumens, about as bright as 40 standard lightbulbs. Nonetheless, I had not addressed the collimation problem, and the light was still very uncomfortable to look at.
My next iteration was squarely focused on the optics and collimation problem. The fundamental problem was just lensing, a diffuse point light source needed to be turned into a collimated one. That means all those light rays emanating in every direction needed to be bent so they all went in only a single direction. How could this be achieved? Well, typically it is achieved 3 ways:
- Refractively - this is the most obvious and familiar light shaping technique. Because light has different speeds in different materials, it can effectively be bent/refracted by a material with a slower speed of light and varying thickness. While this is typically achieved by a single large optical element, especially for imaging, the thickness is quite difficult to accomodate in most designs in both cost and size. Fortunately, a simple trick called the Fresnel lens accomodates this by splitting the lens into many smaller pieces, each with a different thickness. This allows the lens to be much thinner, but still have the same effect. The downside is that the lens is no longer continuous, and the image is not as sharp. This is the technique used in the laptop screens, in the DIY Perks videos and is the most common technique for collimating light. The downside is that there is severe chromatic abberation due to the wavelength dependence of the refractive index of light in a material. This means that different colors of light will be bent by different amounts, and the light will have rainbow fringes. This is the same effect that causes rainbows, and is the reason why lenses are typically made of multiple materials with different refractive indices to correct for this effect. This is also the reason why the sun has a rainbow halo around it when viewed through a lens. This is not a problem for light therapy, but it is a problem for me because I want to be able to see colors accurately.
- Reflectively - surprising for most new to optics, this is the most economical and accurate method for focusing/bending light. A suitably curved reflector can operate like a lens but without the wavelength dependence of refraction causing issues. This means no chromatic abberation, and also no need to perfectly form a solid, precisely shaped curve of material. The downside is the size of the setup, the light now needs to be bounced off a reflector instead of passed through something, which can be difficult to accomodate in most setups. This is the lensing technique most commonly used in advanced telescopes and studio lighting setups.
- Diffractively - this is the most novel technology available for light shaping. It effectively utilizes the wave nature of light to bend light. Instead of allowing the light to slow down in different areas, it uses constructive and destructive interference patterns to bend light. This is the technique used in holograms, and is the most accurate and compact method for light shaping. The downside is that it is very difficult to manufacture, and is typically only available in very small sizes. This is the technique used in the most advanced microscopes, potentially could even enable a negative refractive index for imaging beyond current limits of any technology, and is the most promising for the future of light shaping. Unfortunately, it is pretty far out of my reach at the moment. Especially for a lamp.
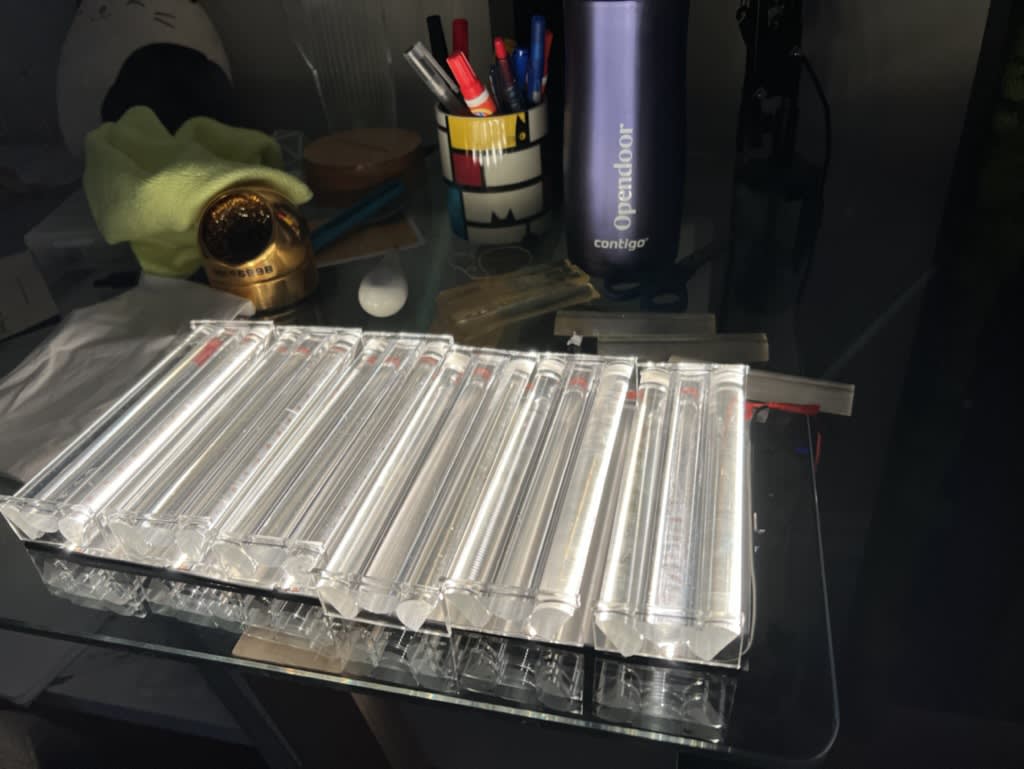
Naturally, I opted to better understand the first two options. I started by evaluating some small collimator lenses I found on ebay. I needed lenses that would fit on my tiny LEDs from the LED strip, a difficult task. Once I did find them, I found that their beam width wasn't exactly what I wanted. I needed collimation, or as close as I could get, but the smallest beam divergence I could find was 10 degrees, and most were at least 30 degrees. Additionally, the collimators' focal length was so long that they would collect light from multiple LEDs, which complicated the focal situation even more. I researched these collimators and learned that they achieved their tight focal length despite their small size by taking advantage of both refraction and reflection, namely they use what's called Total-Internal Reflection. At certain angles and with certain materials, light instead of refracting through a surface actually turns all the way around and reflects off the interior of the surface instead. Crazy, I know. But this is actually how fiber optic cables work, carrying light enormous lengths and enabling much of the crazy bandwidth of the internet underneath the ocean. The collimators I found were using this effect to achieve their small size, but the downside was that they were not very accurate. The light was not collimated, but instead was focused into a small cone. This was not what I wanted, but it was a start. I decided to try to build my own collimator using the same technique, but with a linear profile rather than a radial one. After all, my LEDs aren't uniformly spaced on the panel, they are in strips. I worked with an online light simulator to design a shape that would effectively collimate the light, then instead of projecting that shape radially, I projected it linearly. Then, I needed to manufacture it. This was when things got interesting. I learned that 3D printing optically clear materials was extremely difficult, and while a number of folks had been experimenting with doing it via FDM, if I actually wanted clear material I should go with a transparent resin. Yes, that seemed crazy to me too. Isn't the whole way the resin cures via light? How could it simultaneously harden via light and be transparent to it? Well, it won't be transparent to UV light apparently! So, I got some transparent resin, and after much trial and error managed to get something working. But after one of my first prints succeeded, when I went to print a second one disaster struck. The LCD for the printer came off as I peeled up the print tray. I had no idea what to do, and I was devastated. I had spent so much time and effort on this, and now it was all gone. Not only that, but I was about to leave for a trip and was hoping to finish at least this prototype before I left. Devastated, I went for a walk, and on that walk I realized that the shape I had design could actually be manufactured very simply. I just needed 3 half cylinders of material with a particular radius. I could just cut them out of acrylic! I went to my plastic supplier, bought the half cylinders cut to my exact lengths, designed a simple jig to assemble them that I could place at the ends, laser cut that jig, placed the half cylinders in the jig, and bam! I had a custom designed collimator that could direct light exactly where I wanted it. After this project, I was able to start building more advanced electronics, and mostly left this behind. I still have some ideas I'd love to try out, but manufacturers are beginning to sell High CRI LED skylights and the results are quite good for the cost. I also just moved to a new apartment with brighter windows, so I'm not sure I'll be able to justify the effort. But I'm glad I did it, and I'm glad I learned so much along the way.

1 of 6
Sources: 1: How to build a lumenator 2: A new option for building lumenators 3: Lumenator 4: Inadequacy and Modesty 5: DIY Perks 6: DIY Perks - Artificial Window from Laptop Screens 7: DIY Perks - Artificial Sun